
Procedure
Add structured data to HTML in the web page. For example Blogger web page.
Login in blogger
https://www.blogger.com/about/?bpli=1

You can use your Gmail account. We will share a job site account with you to work and you have to create your own blog to become an author.
I'll demonstrate it in Blogger so it's easy to understand.
So, accept an invitation to work on blog or create your own blog with Google account.
Normally we will send you an invitation when your blog is ready and job description is already added by copywriter.

First screen will ask you for a login. Use your Gmail account where you received email.

Next you have to accept your author permissions for this blog.

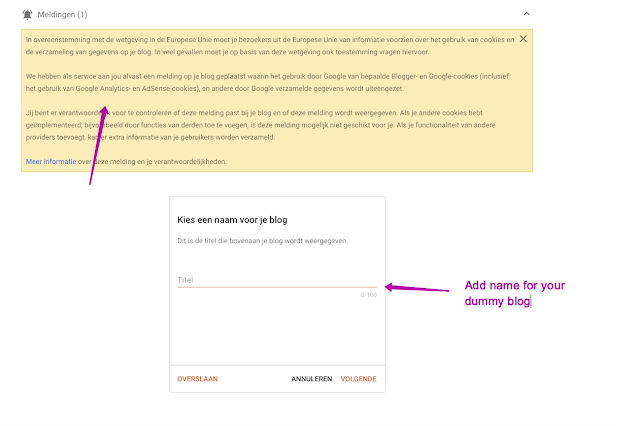
In most cases because you don't have an account with a blogger yet you have to accept a user condition and create a blog. This blog is only necessary to receive rights as an author. You don't have to use it further but you have to create one because together with this blog creation, necessary permissions are also added to your account.

Select items that are still in draft status.

Those are posts that have not yet been published and have not yet been scheduled.
Check carefully whether the post is really a job description, sometimes you don't only see vacancies published by copywriters.

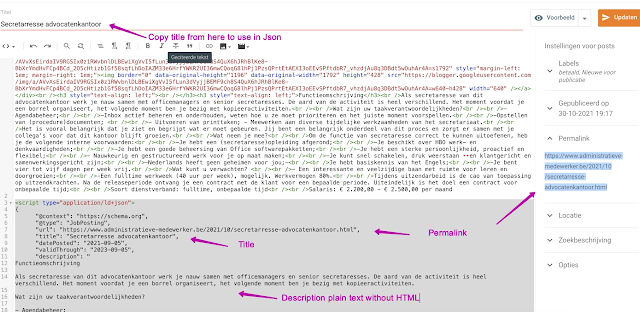
Create new posts and add structured data. To add structured data you have to switch from WYWYG mode to HTML.


Use this code in HTML.
<script type="application/ld+json">
{
"@context": "https://schema.org",
"@type": "JobPosting",
"url": " ",
"title": " ",
"datePosted": "2021-09-05",
"validThrough": "2023-09-05",
"description": "
",
"industry": "",
"employmentType": "Permanent",
"baseSalary": {
"@type": "MonetaryAmount",
"currency": "EUR",
"value": {
"@type": "QuantitativeValue",
"value": 24.00,
"unitText": "HOUR"
}
},
"salaryCurrency":"EUR",
"hiringOrganization": {
"@type": "Organization",
"name": "Global Recruitment Selection",
"url": "https://www.globalrecruitment.info",
"logo": "https://www.globalrecruitment.info/static/Logo-150x150.png"
},
"jobLocation": {
"@type": "Place",
"address": {
"@type": "PostalAddress",
"addressLocality": "Antwerpen",
"addressRegion": "Antwerpen",
"addressCountry": "België",
"postalCode":"2000",
"streetAddress":"Franklin Rooseveltplaats 12"
}
}
}
</script>
<p><iframe frameborder="0" height="997" marginheight="0" marginwidth="0" src="https://docs.google.com/forms/d/e/1FAIpQLSfBsZsISRUKwVHeAKEZbNq2LAGD9jLUY3B70LEQ3pw63RsL3Q/viewform?embedded=true" width="640">Loading…</iframe></p>
Now save your post and make it scheduled in the future. You can do this by setting the date of publication in the future and clicking on publish.

This is how you process all posts that are in concepts.
What is also often needed is to find an image and add it to your blog.
See next post about images.
Comments
Post a Comment