This tutorial consists of two parts:
A public website where users can view and vote.
An administration page where you can add, modify, and delete surveys.
Create project
Change from the command line to the directory where you want to save the code and run the following command:

This is what startproject creates:

Every file has a different task.
In this tutorial, we'll create our survey application in the same directory as your manage.py file, so it can be imported as its own top-level module, rather than as a submodule of mysite .
Create a polling application
To build your application, make sure you are in the same directory as manage.py and enter the following command:

This will create a catalog query with the following structure:

write down your first view
Let's write the first view. Open the polls/views.py file and paste the following Python code:

This is the simplest view in Django. In order to call a view, we need to map it to a URL - for this we need a URLconf.
To create a URLconf in the polls directory, create a file named urls.py. Your application directory should now look like this:

In the polls/urls.py file, paste the following code:

The next step is to point the root urlconf to the polls.urls module. In mysite/urls.py add an import of django.urls.include and add include() to the urlpatterns list so you have:

You have now included an index view in the URLconf. Check if it works with the following command:

Visit http://localhost:8000/polls/ in your browser and you should see the text "Hello, world. You are in the polls index.", which you defined in the index view.
Set up database
Now open mysite/settings.py. It's a regular Python module with module-level variables representing Django settings.
We need to create tables in the database before we can use them. To do this, run the following command:

Create Models
Now we define your model - basically a database layout with additional metadata.
In our survey application, we created two models: question and choice. An issue has an issue and a release date. The selection has two fields: the text of the selection and the vote count. Each choice is associated with a question.
These concepts are represented by Python classes. Edit the polls/models.py file as follows:

Activate models
This small snippet of model code provides a lot of information for Django. With this, Django can:
Create a database schema (CREATE TABLE statement) for this application.
Build a Python database access API to access Question and Choice objects.
But first we need to tell our project that the polls application is installed.
To include the application in our project, we need to add a reference to its configuration class in the INSTALLED_APPS setting. The PollsConfig class is in the polls/apps.py file, so its dotted path is polls.apps.PollsConfig. Edit the mysite/settings.py file and add this dotted path to the INSTALLED_APPS setting. It looks like this:

Now Django knows it needs to include the polls application. Let's run another command:

You should see something as:

There is a command that does the migration for you and automatically manages your database schema - it's called "migration", we'll get to that later - but first let's see what SQL will do this migration. The sqlmigrate command takes migration names and returns their SQL:

You will see (we’ve reformatted for readability):

Run migrate again in order to create those model tables in the database:

API
Let’s play around with the free API Django gives you. To start, use this command:

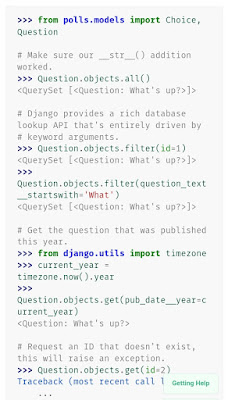
Explore the database API:


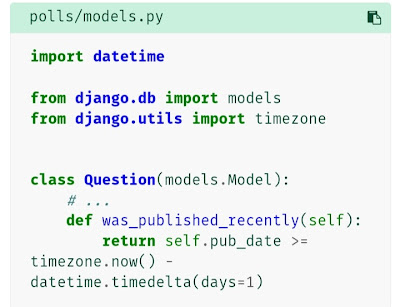
<Question: Question Object (1)> is not a useful representation of this object. Let's fix this by editing the Question model (in the polls/models.py file) and adding the __str__() method to Question and Choice :

Also add a custom method to the model:
Save your changes and start a new interactive Python shell by running python manage.py shell again:


The django admin
Create an admin user
First, we need to create a user who can log into the admin site. Run the following commands:

Enter your desired username and press enter.

Then you will be asked for your desired email address:

The last step is to enter your password. Enter your password twice, the second time is a confirmation.

Start the development server
The Django admin site is enabled by default. Let's start the development server and explore it.
If the server is not running, start it as follows:

Now go to http://127.0.0.1:8000/admin/. You will see the admin’s login screen:

Enter the admin site
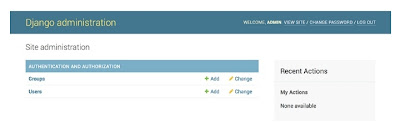
Log in with the superuser account you created earlier. You will see the Django admin index page:
Make the poll app modifiable by the admin
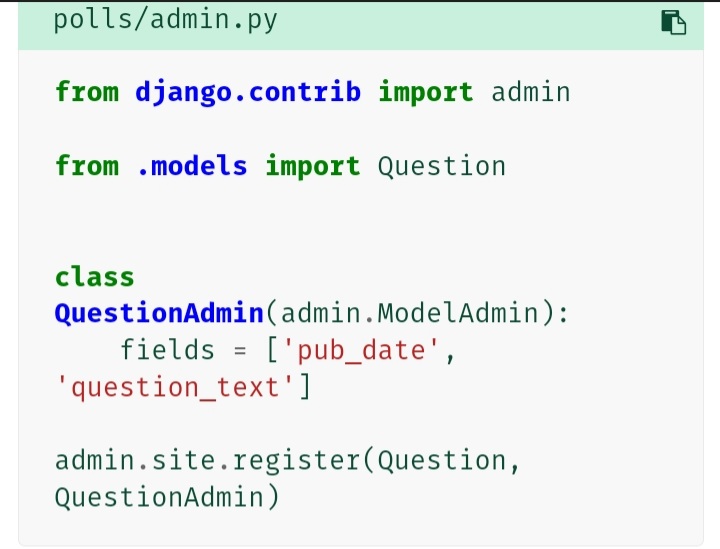
We need to tell the admin that Question objects have an admin interface. Open the polls/admin.py file, and edit it like this:

Explore the free admin functionality
Now that we have registered Question, Django knows that it will be displayed on the admin index page:

Click on "Questions". You are now asking a question on the Change List page. This page displays all the issues in the database, you can select one to change. There is the "what's wrong?" question we created earlier:

Click the “What’s up?” question in order to edit it:
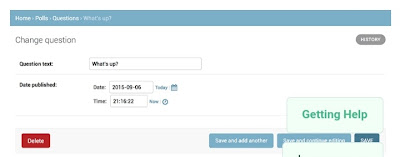
Change the "Publish Date" by clicking the "Today" and "Now" links. Then click "Save and continue editing". Then click "History" in the upper right corner. You'll see a page with all the changes made to this object via the Django admin, along with the timestamp and username of the person who made the change:

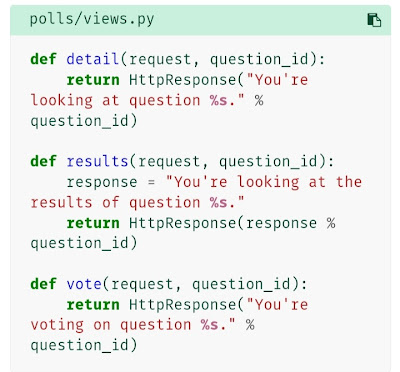
Write more views
Let’s add more views to polls/views.py. These are slightly different, because they take an argument:
Connect these new views to the polls.urls module by adding the following path() calls:

Here's a new index() view showing the last 5 polled questions in the system, separated by commas, by post date:

In your survey directory, create a directory called templates. Django looks for templates there. In the templates directory you just created, create another directory called polls and inside it create a file called index.html. In other words, your templates should be located at polls/templates/polls/index.html. Since the app_directories template loader works as described above, you can call this template polls/index.html in Django.
Paste the following code into this template:

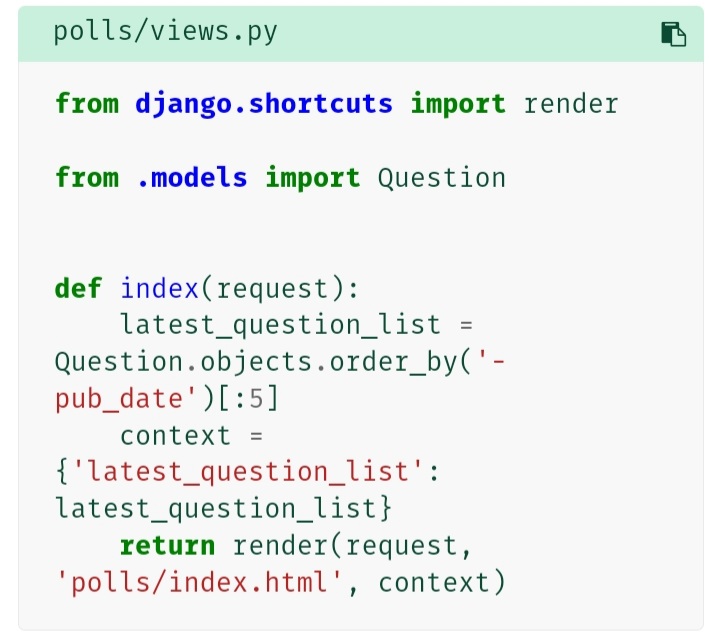
Update the index view in polls/views.py to use the template:

A shortcut: render()
It's a very common idiom to load a template, populate the context, and use the result of rendering the template to return an HttpResponse object. Django provides a shortcut. Here's the full index() view, rewritten:
Raising 404 error
Let's tackle the question detail view - the page that displays the question text for a particular survey. Here is the view:

New concept here: if the issue with the request ID doesn't exist, the view will throw an Http404 exception.
If you’d like to get the example working, a file containing:
shortcut: get_object_or_404()
Using get() and incrementing Http404 is a very common idiom if the object doesn't exist. Django provides a shortcut. Here is the overridden detail() view:

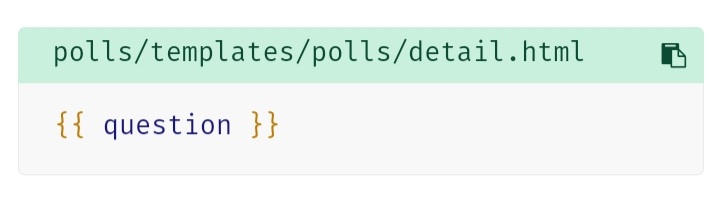
Using the template system
Return to the detail() view of our survey application. Given the context variable issue, the polls/detail.html template might look like this:

Remove hardcoded URLs
When we wrote the link to the question in the polls/index.html template, the link section was hardcoded as follows:

The problem with this hard-coded, tightly coupled approach is that it becomes difficult to change URLs in projects with many templates. However, since you defined the name parameter in the path() function of the polls.urls module, you can use the template tag { Use %url%} to remove the dependency on a specific URL path defined in the URL configuration:

This works by looking for URL definitions specified in the polls.urls module. You can see exactly where the URL name for "details" is defined below:

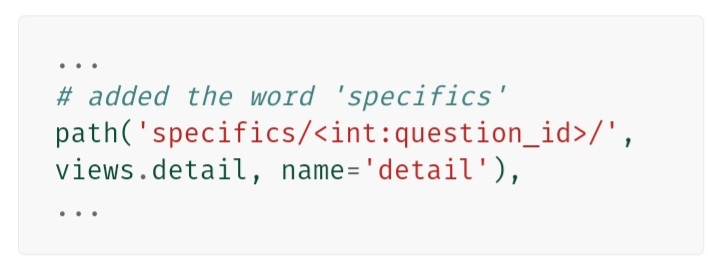
If you want to change the URL of the polls detail view to something else, maybe something like polls/specifics/12/, instead of doing it in a template (or templates), you can change it to polls/urls.py:
Namespace URL name
The Tutorial project has only one application, Polls. In a real Django project, there might be five, ten, twenty or more applications. How does Django differentiate URL names between them? For example, a survey app has a detailed view, as does an app for the same project as a blog. When using the {% url %} template tag, how do I let Django know which application view to create for the URL?
The answer is to add the namespace to your urlconf. Go ahead and add an app_name to the polls/urls.py file to set the application's namespace:

Change the polls/index.html template from:
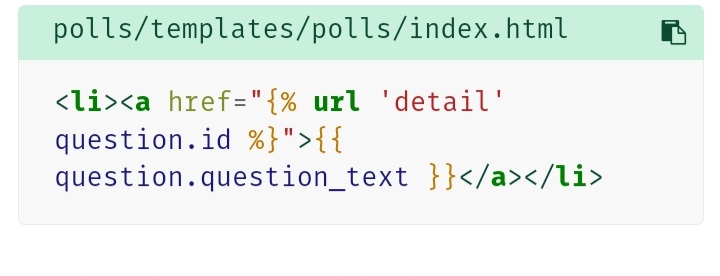
to:

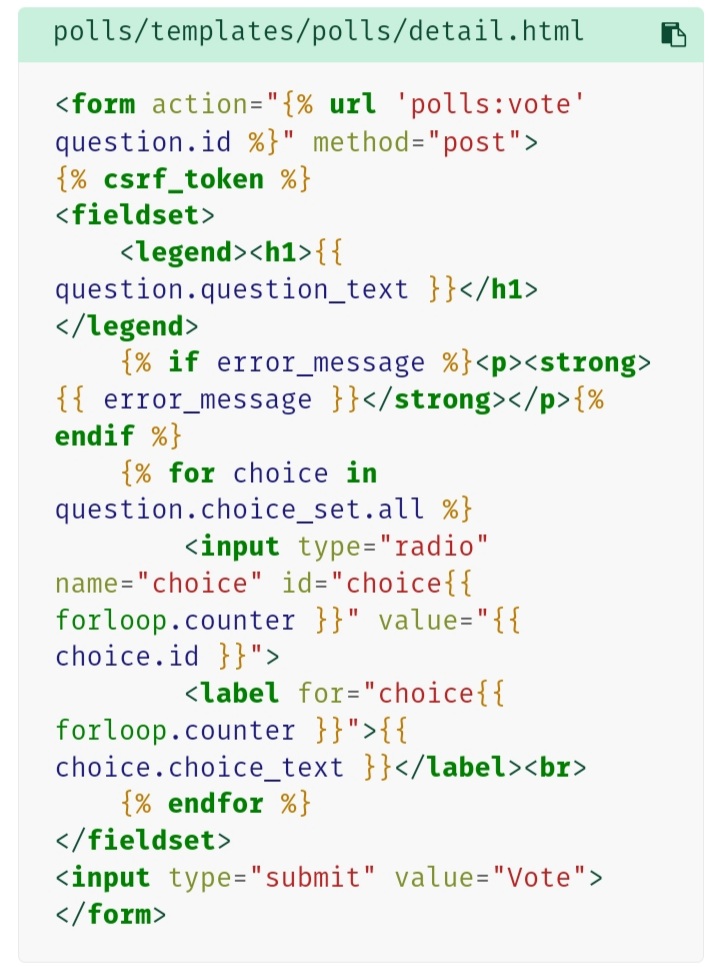
Writing a minimal form
Let's update our polls details template (polls/detail.html) so that the template contains an HTML <form> element:
Create a Django view that handles the submitted data and does something with it. We already created a URLconf for the polls application which has this line:

We also created a dummy implementation of the vote() function. Let’s create a real version. Add the following to polls/views.py:
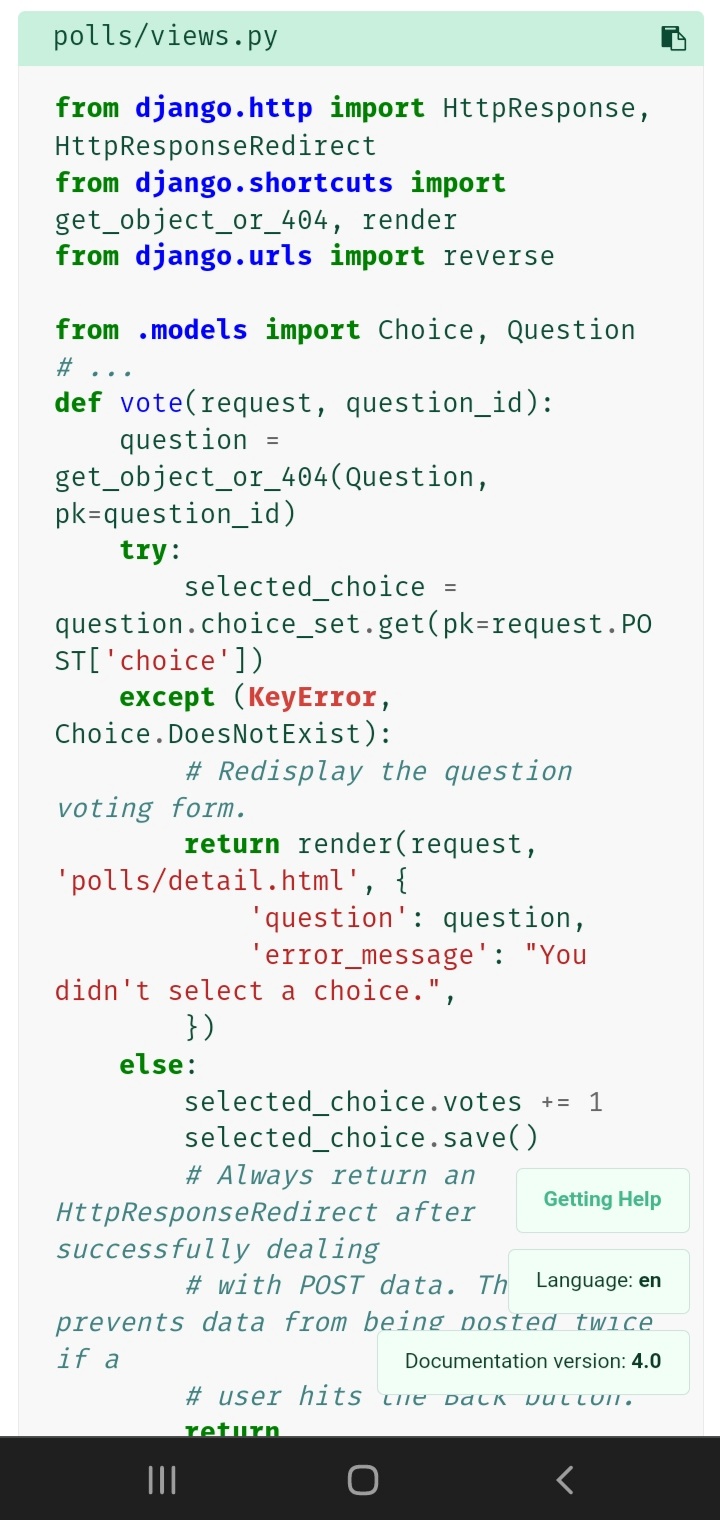

This reverse() call will return a string like
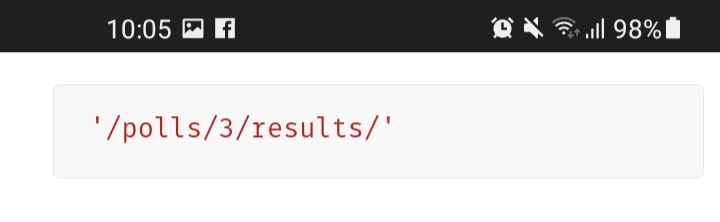
where the 3 is the value of question.id. This redirected URL will then call the 'results' view to display the final page.
After someone votes on a question, the vote() view redirects to the question's results page. Let's write this view:

Create a polls/results.html template:

Use generic views: Less code is better
Amend URLconf
Open the polls/urls.py URLconf and change it to:

Amend views
Next, remove old index, detail, and results views and use Django’s generic views instead. Open the polls/views.py file and change it to:


Run the server, and use your new app based on generic views.
Writing your first test
Identifying bugs
Confirm the bug by using the shell to check the method on a question whose date is in the future:


Since things in the future are not "current", this is clearly wrong.
Create tests to reveal bugs
What we've just done in the shell to test the problem is exactly what we can do in an automated test, so let's make it an automated test.
Paste the following into the tests.py file of the survey application:

Here, we create a django.test.TestCase subclass that has a method to create a Question instance with pub_date in the future. Then we check the output of was_published_recently() - it should be False.
Running tests
In the terminal, we can run our test:

and you’ll see:

Fixing the bug
Question.was_published_recently() should return False if its pub_date is in the future. Change the method in models.py to only return True if the date is also in the past:

and run it again:

After we identify a bug, we write a test to find it and fix the bug in the code to make our test pass.
More comprehensive testing
Here, we can further specify the was_published_recently() method; in fact, it would be very awkward if we fixed one bug while introducing another.
Add two more test methods in the same class to test the behavior of the method more broadly:

The Django test client
Django provides a test client to simulate user interaction with view-level code. We can use it in tests.py or even shell.
We'll start over from the shell, where we need to do some things that we don't need in tests.py . The first is to set up the test environment in the shell:
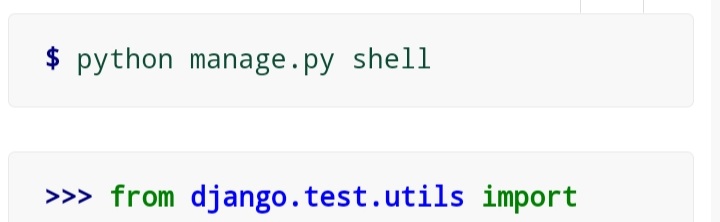

Now we should import the test client class (later in tests.py we will use the django.test.TestCase class, which comes with its own client, so this won’t be required):

Now we can ask the client to do some work for us:

Improve the view
The list of polls shows polls that have not been published (i.e. future polls with pub_date). Let's get this out of the way.
Earlier, we introduced class-based views based on ListView:

We should amend the get_queryset() method and change it so it also checks the date by comparing it with timezone.now(). We need to add an import:

and we must amend the get_queryset method:

Testing the new view
You can now verify that the runserver behaves as expected by starting the runserver, loading the site in the browser, creating issues with past and future dates, and checking that only published issues are listed. You don't want to have to do this every time you make a change that might affect it. So let's also create a test based on the shell session above.
Include the following to polls/tests.py:

and we’ll create a shortcut function in order to create questions and a new test class:


Test the DetailView
What we have works well; even if future questions don't show up in the index, users can still access them if they know or guess the correct URL. So we need to add a similar constraint to the DetailView:

Then we should add some tests, to check that a Question whose pub_date is in the past can be displayed, and that one with a pub_date in the future is not:

Customize the App's Appearance
First, create a directory called static in your polls directory. Django looks for static files there, similar to how Django looks for templates in polls/templates/ .
Inside the static directory you just created, create another directory called polls, and inside it, create a file called style.css. In other words, your stylesheet should be located at polls/static/polls/style.css. Because of the way the AppDirectoriesFinder static file finder works, you can call this static file polls/style.css in Django, similar to how you reference the template path.
Paste the following code into this stylesheet (polls/static/polls/style.css):

Add the following at the top of polls/templates/polls/index.html:

Start the server (or restart it if it’s already running):

Reload http://localhost:8000/polls/ and you should see the question link is green (Django style!), which means your stylesheet is loaded correctly.
Add a background image
Next we create a subdirectory for images. Create an images subdirectory in the polls/static/polls/ directory. Put an image called background.gif in this directory. In other words, put your image in polls/static/polls/images/background.gif .
Then add to your stylesheet (polls/static/polls/style.css):

Reload http://localhost:8000/polls/ and you should see the background loaded at the top left of the screen.
Custom Admin Form
Registering the Question model with admin.site.register(Question) allows Django to create a default form representation. Often you will want to customize the appearance of the admin form. You can do this by telling Django the options you want when registering the object.
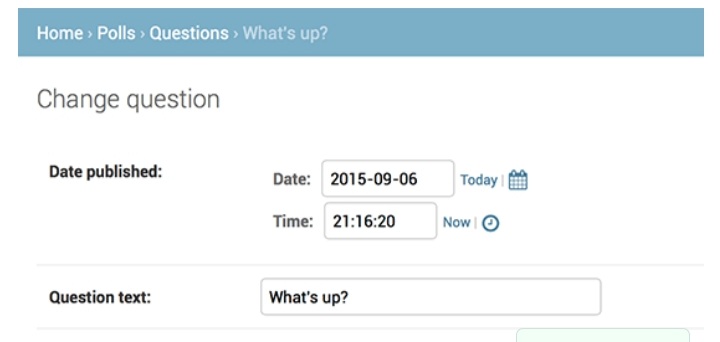
Let's see how it works by rearranging the fields in the edit form. Replace the admin.site.register(question) line with:
This change makes the “Publication date” come before the “Question” field:
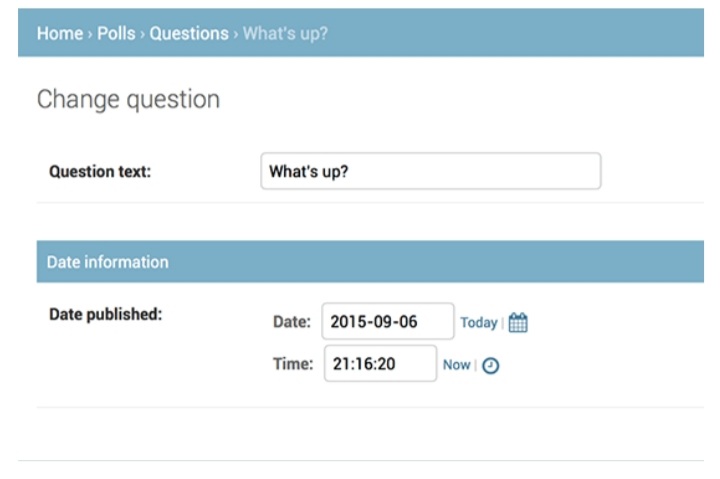
You might want to split the form into sets of fields:

The first element of each tuple in fieldsets is the title of the fieldset:
Add related objects
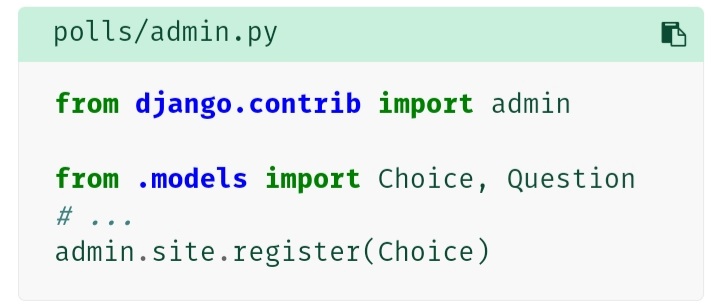
We have our issue admin page, but an issue has multiple choices, and the admin page doesn't show any choices.
There are two ways to solve this problem. The first is to register Choice with the administrator, as we did with Question:
Now “Choices” is an available option in the Django admin. The “Add choice” form looks like this:

It would be better if you could add a set of options directly when creating the question object. Let's make it a reality together.
Remove the register() call for the Choice model. Then edit the registration code of the question as follows:

The “Add question” page looks like this:
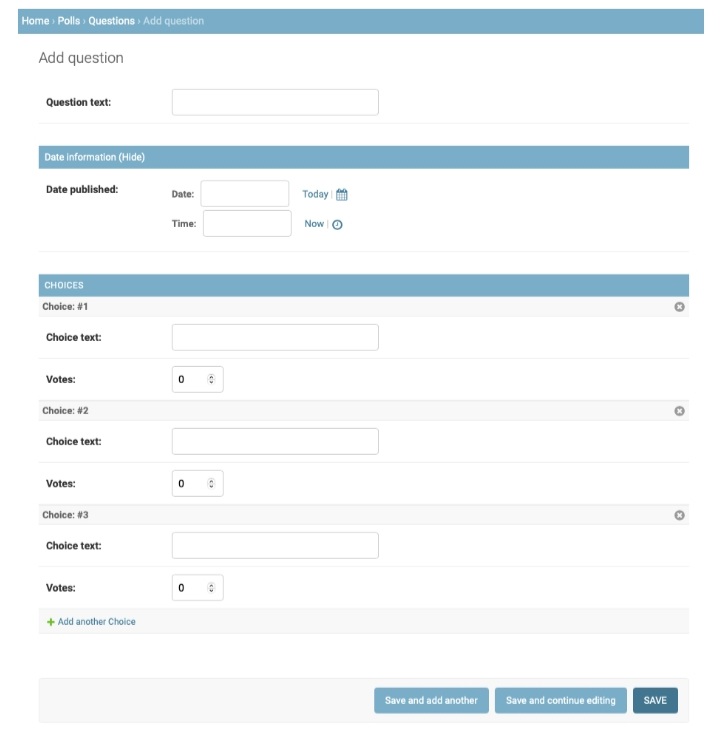
Here's how it works: there are three slots for related selections - specified by extra - and every time you go back to the modification page of an already created item, you get another three extra slots.
At the end of the three current slots, you'll find an "Add another selection" link. Clicking it will add a new slot. If you want to delete an added slot, you can click the X in the upper right corner of the added slot. This image shows an added slot:

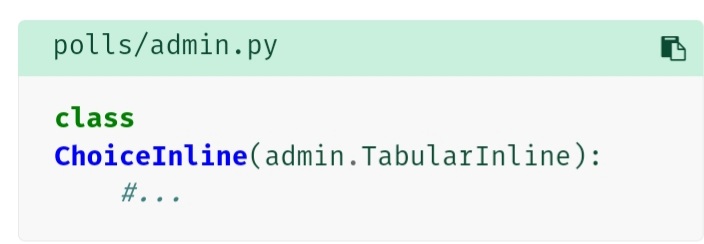
Displaying all the fields for entering the relevant selection object takes up a lot of screen space. Therefore, Django provides a tabular way to display related objects inline. To use it, change the ChoiceInline declaration as follows:
With that TabularInline (instead of StackedInline), the related objects are displayed in a more compact, table-based format:

Customize Admin Change List
Now that the issue management page looks good, let's make some changes to the changelist page - the page that displays all issues in the system.
Here's what it looks like at this point:

By default, Django displays str() for each object. But sometimes it would be more helpful if we could display a single field. To do this, use the list_display management option, which is a tuple of field names, displayed as columns on the object's changelist page:
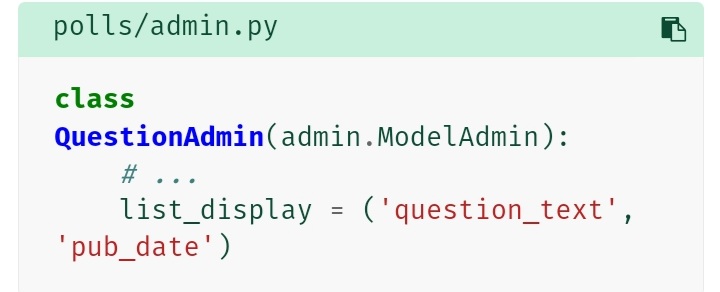
For good measure, also include the was_published_recently() method:

The question change list page looks like this now:

You can click on the column headers to sort by these values, except for the was_published_recently header, as sorting by any method's output is not supported. Also note that for was_published_recently, the column header defaults to the name of the method (replace underscores with spaces), and each row contains the string representation of the output.
You can improve this by using the display() decorator for this method (in polls/models.py ) like this:

Edit your polls/admin.py file again and add an improvement to the Question change list page: filters using the list_filter. Add the following line to QuestionAdmin:

That adds a “Filter” sidebar that lets people filter the change list by the pub_date field:

The type of filter displayed depends on the type of field you are filtering on. Because pub_date is a DateTimeField, Django knows that there are appropriate filter options: Any Date, Today, Past 7 Days, This Month, This Year.
This is going well. Let's add a search function:

Customizing your project’s templates
Create a templates directory in your project directory (the one containing manage.py ). Templates can reside anywhere on the filesystem that Django can access. (Django runs as whatever user the server runs as.) However, it's a good convention to keep templates in your project.
Open your settings file (mysite/settings.py, remember) and add a DIRS option to the TEMPLATES setting:

Now create a directory called admin in your templates and copy the template admin/base_site.html into that directory from the default Django admin templates directory in the Django source code itself (django/contrib/admin/templates).
Then edit the file and replace {{ site_header|default:_('Django Administration') }} (including the curly brackets) with the site name you see fit. You should end up with a code snippet like this:

Comments
Post a Comment